4. The Iterator Follower Paradigm
IMPORTANT The iterator-follower paradigm is at the heart of Monocurl. Take time to really understand it!
4.1 Basics of IF-Paradigm
We discussed how Monocurl is about interpolation between different keystates. Lets see how this works in practice.
DEFINITION In addition to let and var variables, we have tree variables which are used for variables that we need to show on screen.
In particular, when you create a tree variable, there are two variables behind the scenes: the iterator and the follower. The iterator is more or less a normal variable you can do operations on. The follower, however, is special in that any changes to it are reflected on screen. Initially, the follower is empty.
The idea is that you make changes to the iterator using normal code. Then, using animations, we can tell the follower about the changes. In particular, it "follows" the iterator from its previous state. The exact manner in how it follows depends on the follower animation we use. Let's take a look at some examples.
4.2 Set
IMPORTANT The simplest follower animation is Set.
It instantly transforms the follower into the iterator. Example (note that Wait(1) does nothing for the time period). Also, we use p += to add an animation to the play list. Don't worry about the details too much, it's just saying that we want to play this animation.
tree circ = Circle:
    center: ORIGIN
    radius: 1
    tag: {}
    color: default

/* currently: */
/* iterator -> Circle */
/* follower -> {} */
p += Wait(1)

/* currently: */
/* iterator -> Circle */
/* follower -> {} */
p += Set:
    vars&: circ

/* currently: */
/* iterator -> Circle */
/* follower -> Circle */

p += Wait(1)

circ.radius = 2

/* currently: */
/* iterator -> Circle {r = 2} */
/* follower -> Circle {r = 1} */
p += Set:
    vars&: circ

/* currently: */
/* iterator -> Circle {r = 2} */
/* follower -> Circle {r = 2} */
Also, note that we can use Set on scene variables such as background or camera. See if you can try changing the background color using Set!
4.3 Write, Fade, Grow
IMPORTANT Write, Fade, and Grow are useful for showing or hiding in a more continous fashion. Here's an example of write.
tree tex = Tex:
    tex: "\int_{-\infty}^{\infty} e^{-x^2}dx = \sqrt{\pi}"
    scale: 1
    stroke: CLEAR
    fill: BLACK
tex = Centered:
    mesh: tex
    at: ORIGIN

p += Write:
    meshes&: tex
    time: 3
We emphasize you can also "Unwrite/Shrink/FadeOut" using these animations, despite their name. This is done by setting the iterator to a null state, and then having the follower follow to that state.
tree tex = Tex:
    tex: "\int_{-\infty}^{\infty} e^{-x^2}dx = \sqrt{\pi}"
    scale: 1
    stroke: CLEAR
    fill: BLACK
tex = Centered:
    mesh: tex
    at: ORIGIN

/* this is important! otherwise, we would be fading out the empty state */
p += Set:
    vars&: tex

/* unwrite by setting to null */
tex = {}
p += Fade:
    meshes&: tex
    time: 1
4.4 Transform
IMPORTANT If we want to transform between two intermediate states, Transform is a typical choice.
It works by performing a pointwise interpolation algorithm. Also, notice how we can apply animations to multiple variables at once using {tree_a, tree_b} syntax. Finally, it's important that we have the initial Set call, as otherwise we would be transforming from the empty state.
tree shape = Square:
    center: ORIGIN
    width: 1
    tag: {}
    color: default
tree dots = Dot:
    point: RIGHT
    tag: {}
    color: default

p += Set:
    vars&: {shape, dots}

/* move dot */
dots.point = {2, 1, 0}
p += Transform:
    meshes&: dots
    time: 1

dots.point = {2, 0, 0}
shape = Circle:
    center: ORIGIN
    radius: 1
    tag: {}
    color: default

/* transform both followers to current iterator state */
p += Transform:
    meshes&: {dots, shape}
    time: 1
4.5 Custom Animations
We now can create some (simple) custom animations. You don't create custom animations as often as you do custom meshes, but it's still useful for abstracting common behavior. Notice that var& with the ampersand is used to denote a reference variable for taking in an iterator. Also, custom animations should return a vector of their animations.
/* note that custom animations should return a tree */
func SlowFade(mesh&) = identity:
    var ret = {}
    ret += Wait(1)
    ret += Fade:
        meshes&: mesh
        time: 2
    element: ret

tree t = Circle:
    center: ORIGIN
    radius: 1
    tag: {}
    stroke: BLACK

p += SlowFade:
    mesh&: t
We'll see more complex and useful examples in the future.
4.6 (Optional) Delayed Execution
This side is probably a bit technicaly for most people, but for those interested Monocurl uses a delayed execution environment. Here's why this is nice.
Consider an animation system where animations are run as soon as you create them. We will refer to this as eager execution. For instance, we might have the following pseudocode to do two animations in series:
run(Show(a))
run(Hide(b))
If we want to do two things in parallel, the following is an approximate representation:
run(Show(a), Hide(b))
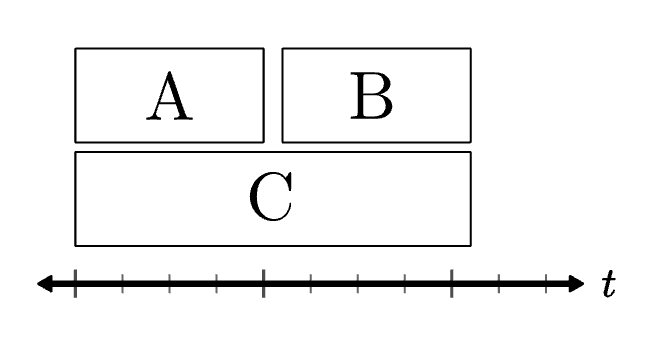
However, suppose we have three animations, A, B, C. And we want to run A and B in series, and in conjunction with that entire group, we want to run C (see diagram below).
REMARK Before we introduce our method, we should say that our's is not the only solution. In particular, using generators a la Unity Coroutines or Motion Canvas is more standard. However, our method is simpler to implement, and we believe it encourages a more natural method of thinking.
We mention that eager execution is awkward in the A-B-C case, but that's not necessarily true. Indeed, if we have references to all three animations, then using an animation operator is not that bad.
A = ...
B = ...
C = ...

run(Series(A, B), C))
Where does this become a problem is if A and B are within their own function. Consider the following pseudocode:
func do_a_and_b(void)
    A = ...
    B = ...

    run(A)
    run(B)

C = ...
/* at this point, if we call do_a_and_b, we lose the ability to call run(c) in parallel */
Here, it becomes very awkward to perform the do_a_and_b animation in parallel with C. One possible solution is to return an animation operator on A and B, and then we're good again:
func do_a_and_b(void)
    A = ...
    B = ...

    return Series(A, B)

C = ...
run(do_a_and_b(), C)
But this is just delayed execution! This hopefully gives an explanation of why delayed execution solves a lot of problems, and is a good choice.
DEFINITION delayed execution is the idea that animations are executed separately from their initialization. That is, there is an initialization period and an execution period.
In initialization, we write down all the animations that will be needed (specifying which should be in parallel/series with what). In execution, all the specified animations are run together. Do note that in this particular case, coroutines serve a similar role. However, we still maintain that delayed execution, once understood, leads to a more natural thinking process.
Finally, we note that currently there are some downsides to the play list model. In particular, creating something like a LaggedMap from manim is not truly supported (the one that exists in the standard is kind of fake). However, this is something that can be solved very easily in the future, just has not been done yet. There is nothing about the play list model that stops this.